Quickstart
The primary Manimlib2 objects are Mobjects and Instructions. Mobjects are graphical objects that can be rendered on the screen. Instructions act on Mobjects to change their on-screen appearance as the animation progresses. So the basic structure of an animation is to create the main animation object, create some mobjects, and then run instructions on the created mobjects.
The base mobject contains hooks to the coordinate transformations. Basic mobject types are: VMobject - Vectorized mobject. Vector graphics ImageMobject - Bitmapped images. CompositeMobject - Contains a collection of other mobjects.
Minimal Animation Script
At its most basic, an animation script instantiates one or more graphical objects and exectues a set of instructions that acts on those objects.
A minimal animation script looks something like this:
 1import manimlib2.Manim             as Manim
 2import manimlib2.CommonMobs        as cmob
 3import manimlib2.BasicInstructions as i
 4
 5m = Manim.iManim()
 6
 7rect = cmob.Rectangle([1,1])
 8
 9m.run(
10    i.AddMobject('rect', rect),
11    i.Wait(1.0)
12)
13
14m.play_movie()
The output is a one second animation of the outline of a white rectangle sitting motionless in the center of the canvas.

Let’s take a look at the code.
First we import some common manimlib2 modules and shorten their names using common mnemonics.
In line 5 we instantiate the animation engine, iManim. iManim contains the main animation loop, the Scene object that contains a list of Mobjects (the graphical elements of the animation), the camera object that contains the rendering surface, the Backend where rendered frames are sent, and the list of Instructions that will act on the Mobjects in the Scene.
In line 7, we create a Rectangle, which is a Mobect from the collection of common mobjects. The parameter passed to Rectangle is an iterable describing the size of the rectangle.
In line 9, we invoke the run method of our iManim instance which begins the process of rendering animation frames. run takes a variable number of Instructions as arguments. The animation engine executes those instructions sequentially in the order recieved to create the animation. Once the last instruction has completed, run returns.
Line 10 is the first Instruction, AddMobject, which adds a Mobject to the scene. The first parameter is a dictionary key that we can use to refer to our rectangle in subsequent instructions. The second parameter is a reference to our rectangle instance. Once added to the scene, a mobject will be rendered in each animation frame until it goes off camera or is removed.
Line 11 issues the Wait instruction which simply waits for the specified amount of time without making any changes to the scene. Without the wait instruction in this example, our animation would not contain any output frames since the AddMobject instruction takes zero seconds of animation time.
Finally, Line 14 plays the resulting animation, if one exists and the selected Backend supports the play directive. The default Backend buffers animation frames in memory and the play directive opens a graphical window which displays the animation.
An Actual Animation
Our first example wasn’t much of an animation given that the rectangle didn’t actually move. Let’s make it move across the canvas.
 1import manimlib2.Manim             as Manim
 2import manimlib2.CommonMobs        as cmob
 3import manimlib2.BasicInstructions as i
 4
 5m = Manim.iManim()
 6
 7rect = cmob.Rectangle([1,1])
 8
 9m.run(
10    i.AddMobject('rect', rect),
11    i.MoveTo('rect', [-3,0]),
12    i.Move('rect', [6,0], duration=1.0),
13    i.Wait(1.0)
14)
15
16m.play_movie()
At Line 11, we insterted a MoveTo instruction. This moves our rectangle to absolute coordinates [-3,0]. MoveTo takes an optional duration argument that dictates how much animation time the move should take. The default is 0.0 seconds so in this case, the move is instantaneous.
At Line 12, we inserted a Move instruction, which represents a move relative to the mobject’s current location. This moves our rectaingle 6 units horizontally and zero units vertically. Here we’ve set the optional duration parameter to 1.0 so the move occurs over 1.0 second of animation time.
Here’s the output

Simultaneous Instructions
What if we want the rectangle to spin 360 degrees at the same time that it’s moving across the canvas? iManim has run_parallel and run_sequential methods that allow you execute instructions however you would like.
 1import manimlib2.Manim             as Manim
 2import manimlib2.CommonMobs        as cmob
 3import manimlib2.BasicInstructions as i
 4
 5rect = cmob.Rectangle([1,1])
 6
 7m.run(
 8    i.AddMobject('rect', rect),
 9    i.MoveTo('rect',[-3.0,0.0]),
10    m.runParallel(
11        i.Move('rect', [6,0], duration=1.0),
12        i.Rotate('rect', 2*3.1415, duration=1.0),
13    ),
14    i.Wait(1.0)
15)
16
17m.play_movie()

The **run_parallel** and run_sequential methods can be nested to achieve
a variety of effects.
 1import manimlib2.Manim             as Manim
 2import manimlib2.CommonMobs        as cmob
 3import manimlib2.BasicInstructions as i
 4
 5rect = cmob.Rectangle([1,1])
 6
 7m.run(
 8    i.AddMobject('rect', rect),
 9    i.MoveTo('rect',[-3.0,0.0]),
10    m.runParallel(
11        m.run_sequential(
12            i.Move('rect', [3, 2], duration=0.5),
13            i.Move('rect', [3,-2], duration=0.5),
14        ),
15        i.Rotate('rect', 2*3.1415, duration=1.0),
16    ),
17    i.Wait(1.0)
18)
19
20m.play_movie()

The Coordinate System
Consider the following script and its output.
 1import manimlib2.Manim             as Manim
 2import manimlib2.CommonMobs        as cmob
 3import manimlib2.BasicInstructions as i
 4
 5rect = cmob.Rectangle([1,1])
 6
 7m.run(
 8    i.AddMobject('rect', rect),
 9
10    i.SetAboutPoint('rect', [-1.5,-1.0]),
11    i.Rotate('rect', 3.1415/6.0),
12    i.Scale('rect', 0.75),
13    i.MoveTo('rect', [5,1]),
14
15    i.Wait(1.0)
16)
17m.play_movie()

The instructions in lines 10 through 13 set the about_point, rotation_angle, scale, and position attributes of the mobject 0respectively. These four parameters represent a coordinate transformation between the internal representation of the mobject and the external coordinate grid.
It becomes clear when we overlay the coordinate grids:
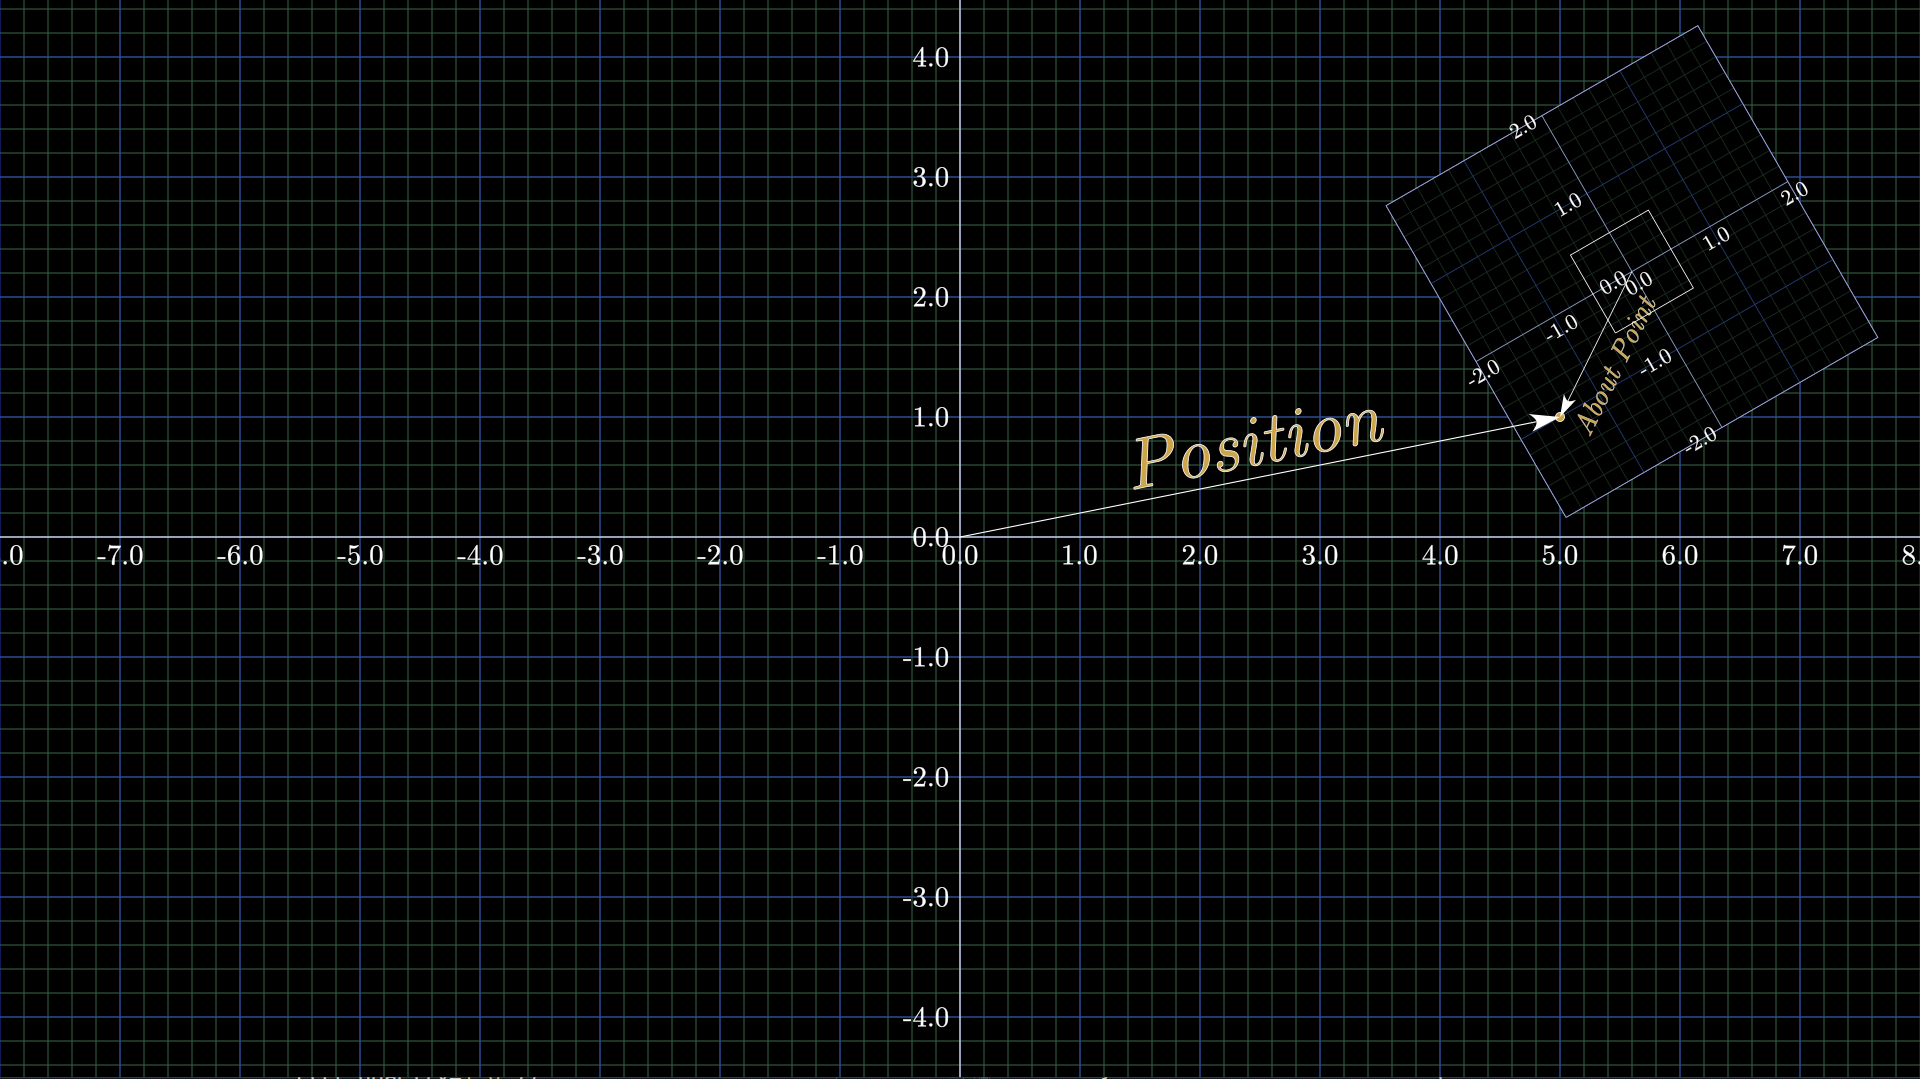
The position attribute represents the postion of the Mobject’s about point with respect to the external coordinate system while the about_point attribute represents the position of the about point with respect to the Mobject’s internal coordinate system. The rotation_angle attribute represents the angle between the axis of the two coordinate systems and scale represents the ratio of internal units over external units.
The Composite Mobject
There are a variety of base Mobject classes that represent vector graphics (VMobject) and raster images (ImageMobject) but the CompositeMobject is possibly the most powerful. The CompositeMobject is, at its most basic, a container to hold a collection of Mobjects and manipulate them as a group. But it also has its own interal coordinate system allowing you to quickly position mobjects relative to one another in the CompositeMobject coordinates and then move the CompositeMobject itself while maintaining the relationships between contained Mobjects. Let’s look at an example.
 1import manimlib2.Manim             as Manim
 2import manimlib2.Mobject           as mob
 3import manimlib2.CommonMobs        as cmob
 4
 5m = Manim.iManim()
 6
 7composite = mob.CompositeMobject()
 8composite.add_mobject(cmob.Rectangle([1,1]),'rect')
 9composite.add_mobject(cmob.Arrow([0,0],[2,0]),'arrow')
10
11m.run(
12      i.AddMobject('composite', composite),
13      i.MoveTo('composite',[3,0], duration=1.0),
14      i.Wait(0.5),
15
16      i.MoveTo(['composite','arrow'], [0.5,0],duration=1.0),
17      i.Wait(0.5),
18
19      i.SetAboutPoint(['composite','arrow'], [-0.5,0.0]),
20      i.Rotate(['composite','arrow'], 3.1415,duration=1.0),
21      i.Wait(0.5),
22
23      i.MoveTo('composite',[0,0],duration=1.0),
24      i.Wait(0.5),
25)
26
27m.play_movie()
In lines 7,8, and 9, we construct a CompositeMobject and add a Rectangle and an Arrow.
The MoveTo at line 13 moves the entire composite to position [3,0] in the coordinate system of the main canvas.
The MoveTo in line 16 moves just the arrow to position [0.5,0] in the coordinate system of the CompositeMobject.
On line 19, we move the about point of the arrow to [-0.5,0.0] in the coordinate system of the Arrow, which puts the arrow’s about point at the origin of the CompositeMobject, which is position [3,0] on the main canvas.
On line 20, we rotate the Arrow 180 degrees (or pi radians) around its about point so that it points back in towareds the center of the canvas.
Finally, the MoveTo on line 23 moves the entire composite back to the origin of the main canvas.